Feeds:
Posts
Comments

Framing!

This post is long overdue, as most of these pictures are from early June.  But these days I experience time much differently.  And my body has recently been under attack from lyme disease!  I’m feeling much better now, but for a good month I didn’t feel like doing anything more than I had to.  But now that I’m over that (hopefully?), I’m excited to share some more pictures of the addition!

Once our wood was delivered from the sawmill Greg got right to work on the post and beam framing, after doing a little cob with Leo:

Which Leo found to be very tasty:

Our 8×8 posts were huge and heavy, especially since the wood had not yet dried out.  Greg notched them all, and managed to get them all up onto the concrete piers by himself, using a wheelbarrow to slide them into place!

Notching:

The first few posts!

My friend Steve came out to help with the post and beam, and also framed out the walls for the kitchen area with rough cut 2x4s, for the light straw clay walls.

Placing one of the beams:

wall raising!:

Here you can see the decorative rafter end detail:

east wall!:

Here’s Greg placing some rafters:

A fancy rafter detail for the last rafter on the west side:

Greg & Kat decking the roof:

It will just be a small step from the balcony onto the living roof!  I think that feature is one of my favorite parts of the addition’s design, especially since this new roof will allow us to finally be able to have easy access to the higher existing roof.  Until now there has been no easy way to get up there!

All this work was from early June, but last week Greg and our good friend Mike spent another week working on the addition, finishing the rest of the roof framing and decking, among a lot of other things.  I will post more photos soon but for now here’s one photo of a view from the east (look how tall the corn got!):


A few weeks ago Greg, Leo, and I went out to the cob house for a couple days, to rescue parts of the south and east walls from Anthophora abrupta… “miner bees!”  Those sweet mama bees were building little nests in my cob wall – beautiful nests with strange looking earthen tubes extending from the openings.  These bees are a common problem for cob structures in our area; our friends’ cob house nearby had almost turned into a sacrificial bee village until they covered over their earthen plaster with a lime plaster.  Since the lime plaster they haven’t had a single bee drill into the cob!  So while we were at the cob house we plastered over the bee nests with some lime…

lime plaster!

While we were there we also did a little planning… for an addition!  We hadn’t decided yet where we would spend this winter, and after some thought we decided that adding on a small room to the cob house would make it a nice place to spend the winter as a family.  So…

This is a rough sketch of the addition, which will be post and beam framing with some straw bale walls and some slip straw walls.  In the drawing the green is the existing cob house, and the blue is the addition, which will be to the south.  We’ll remove the large south facing double window, as well as the foundation underneath it, and that will be an opening to the addition.  The new room will be an  eating area and small kitchen area (with cooking space outside under a large overhang).  The new space will have a living roof that, at one story tall, will be at about the same height as the existing balcony, allowing the cats (and us humans) to walk right from the balcony onto the green roof.  I’m pretty excited about the design!

Greg had a little bit of time off work, so we were able to get started last Thursday.  Reflective in a way of some of the changes in my life, this project is a bit different from the last.  One of the biggest changes in my life as a mother is time.  I can’t even imagine now what it was like to have free time, time to work on projects!  When I see people working quietly in their gardens, reading a book in the shade, or doing just about anything…alone, I look at them with awe, and wonder when my life might include moments like those again.  For now I am appreciating the joy of my relationship with my amazing, cute and curious Leo.  When he’s older maybe we can even build some things together!  So, the challenge with this project will be time- how quickly can two adults and one nine-month-old create a small naturally built addition, without much money?

On Thursday Greg (who is doing most of the work while I watch Leo) only got in a couple hours of work, which was mainly unloading tools and then staking out the site and starting work on the drainage trench.  By the end of the day on Friday the trench was completely dug, graded, and filled with a couple inches of gravel!  We tied in to my existing rubble trench in a couple different spots, and it was satisfying to have the chance to peer into that trench once again, seeing all the layers just as they were so long ago.

On Saturday the drain pipe was laid, the trench filled with the rest of the gravel and then leveled off, ready for the foundation.

Here’s Greg doing a water test – flooding the trench with water to watch how it flows, making sure the water moves quickly down the slope:

Connecting to the existing drainage trench:

Setting in the drain pipe:

Placing rocks around the drain pipe to make sure it stays put in the center of the trench once more gravel gets dumped on top:

Complete!

Sunday Greg cleared the rest of the topsoil and built some concrete forms for the piers that will support our posts (we’re getting some 8″x8″ posts from the local sawmill).  These concrete piers are one of my compromises for this projects, but they are part of what is allowing this room to be built quickly, with structural integrity.  The rest of the foundation is made of urbanite (reclaimed concrete chunks) and salvaged brick.

Concrete piers:

On Monday I left town for a few hours, and when I got back Greg had almost finished dry stacking the urbanite section of the foundation!  He’s so fast!  The rest of the day we worked on the foundation some more – Greg finished the urbanite and we also spent a lot of time gathering bricks from when the old house on the property was demolished.  We spent a lot of time chiseling away the old mortar…

bricks and chipped mortar rubble…

On Tuesday I got to spend most of the day working!  Greg watched Leo while I worked on the brick section of the foundation.  I had never laid bricks before, and had always wanted to try, so I was looking forward to it.  It was really slow going at first as I got my technique down, but was much faster by the end of the day.  I laid bricks until I ran out of mortar right as the sun was setting.  I like that the foundation will be two different materials, as it designates the two different wall systems and the two different “rooms.”  The straw bale walls will be on the urbanite, and create the eating/living room, and the slip straw (also called light clay straw) walls will be on the brick foundation, creating the kitchen area.

leveling

Throughout all this, Leo has been our big helper:

Today it was raining, and we had some errands to take care of, so we left town for the day, but tomorrow we’ll be back to building!

One of my life-long dreams has been to design and build my own home.  When I was a kid I remember watching This Old House and The New Yankee Workshop with my father every weekend, asking him questions the whole time, about the projects, the tools, etc.  But my main question always was, “Can we do that?!”  And watching my dad build things in the garage was one of my favorite activities, and the smell of sawdust still is comforting to me now, just as it was then.  The idea that we could build all these amazing and beautiful things on our own was completely fascinating to me as a child, I was so inspired.  My dad had a huge wooden drafting table, and an old metal toolbox full of stencils and special architectural pencils, and I loved playing with them.  I spent hours and hours with that drafting table, carefully designing houses.  Houses which always included secret hidden rooms that only children could access- usually behind the kitchen cabinets.  The first thing I was “going to be when I grow up” was an architect (except for any time after I came inside from picking flowers.  Then I always decided I would definitely be a florist.)

After a lifetime of public schooling and television and our culture of “experts”, those ideas and dreams had mostly gone away.  It wasn’t until I had dropped out of college and was living in a barn on an organic farm that all these dreams started to return.  Could we really build our own house?  Could we really create the lives we want for ourselves?

Over the years I had read some books.  The Cob Builders Handbook.  The Hand Sculpted House.  Built By Hand really got me!  I’ve flipped through the pages of that book so many times that they are all falling out.  What I really wanted was to take a workshop, but every time I looked for one, which wasn’t all that often, they were always on the west coast.  A few months after finally moving to the land I had bought with three other people I saw a flyer somewhere for a local cob workshop.  I was so excited and signed up right away!

So, in May of 2009 I helped build this cottage:

That week long workshop was an inspiring experience for me, and gave me the confidence to finally start on my own cob house.  I spent the rest of the year helping out on building projects whenever I could, and started scavenging materials for my own home, which I was sketching over and over again on graph paper.  And then in 2010…

I’m reflecting on all this because…

We’re having a week long cob workshop here in Durham in June!

You can check out the info about it here.  Greg and Mike taught the workshop I took in 2009, and they will be the instructors for this workshop, where people will be constructing a cob and straw bale meditation studio and garden wall.  Mike and Greg both apprenticed with the Cob Cottage Company in Oregon, and are awesome instructors.  I’ll be there with Leo to help out and hang out, and my friend Julia is going to be cooking some awesome food with local produce!  I’m pretty excited, it should be a lot of fun!

Reflecting back, not only did taking a workshop give me new building skills, ideas, and experience, but I also made life long connections and friendships with some amazing people.  And then the following year I taught my own cob workshop and once again got to make connections with awesome people that I am grateful to still have in my life.  I’m looking forward to once again getting to participate in another workshop setting and meet new and interesting people.

Building brings people together!


I’ve been meaning to write a new post for a while now, this blog has been so neglected lately.  My days have been full now in a whole new way than before, and I’ve been adjusting to my new life as a mother.  I’m continually surprised by how quickly my days fly by, and by how quickly my son grows and transforms before my eyes!  At first a fresh and tiny human with mostly closed eyes, new to such a bright, dry, sensation filled world.  And now a huge, squirming, laughing, rolling, “talking”, snuggling four month old boy!

My son was born on the last day of August, just before the sunrise.  Born downstairs, right at the foot of the ladder.  And then immediately into my arms for an hour of uninterrupted snuggling and staring into each others’ eyes.  I’ve never worked harder in my life than I did that night!  So many people seem impressed by all the hard work and physical labor that goes into building your own home with natural materials.  But I’m impressed by all these mothers out there!  If you can give birth, and make a new person from your very own body, I’m convinced you can create your own shelter.  We are stronger than we know!

Leo the day he was born!

After the sun came out and in through the southern windows, allowing me to fully see and study every part of my perfect little boy, I also had an appreciation for my environment at that moment.  The first face my son saw was my own, and the first place he knew was the house that I, along with many other people, had sculpted by hand.  When Leo was born he cried, but only for just seconds.  After that he was calm and alert, quietly taking in his new world.  What a special place to be born, in a home whose walls radiate out all the love with which they were built.

Leo and I hardly left the house for a couple magical weeks as we got to know each other more deeply.  Sadly, for the most part we have now been living about an hour away from our sweet cob house, to live where my partner is currently working on a building project.  I miss my house, and look forward to spending more time there some day soon.  And I have plans to finally complete all the unfinished tidbits come spring – finish the exterior plaster, the final layers of roofing for the small eastern roof…install a front door!  I’m definitely craving some creative time spent building, and have even been dreaming lately about some additions to the house.  A bedroom to the east?  Small kitchen to the north?  Oooh, the possibilities are endless.  But right now my time is not!  Soon enough, soon enough…

My son Leopold, born at home August 31st, 8 pounds, 4 ounces and oh so perfect:

4 months old!

This is why I haven’t posted lately:

So, last year I built a house.

And this year my body built…another body!  And now I’m just waiting for my body to release this baby.  But there has been a little bit of work on the house.  After Greg poured the finish layer of the earthen floor, it took a week or two to dry.  And I was very, very excited to see that it dried without a single crack!  Success!

I sealed the floor with four coats of a linseed oil blend I bought from landarknw.com.  It was a bit of a splurge, but I wanted something completely non toxic.  I didn’t want to be breathing in fumes from the boiled linseed oil and mineral spirits from our local hardware store, especially not while pregnant.  Someone on a cob list serve had recommended LandArk’s Earth Finish for earthen floors, so I decided to give it a try.  I ended up using just about one gallon, and even had a little extra to use on some of the wooden parts of the house, mainly the door frame and ladder.  The floor turned out great!  With each coat the color darkened until it reached a deep purplish red, and it seems to be  very hard and durable.  I’ve accidentally knocked my box fan into the ladder opening more than a few times.  Each time that its fallen from the second story onto the earthen floor, it hasn’t even left a mark.  And I’ve mopped it a few times, and it remains unchanged.  I plan on waxing the floor soon, too, so it’ll be interesting to see how that affects the floor as well.

first coat of oil

the first floor..finally lived in!

I’ll post some more pictures soon…

finish floor!

Last Friday Greg came over to pour the final layer of the earthen floor.  Almost 2 years ago, Greg had removed a layer of the earthen floor from a nearby cob cottage he was building, and I brought it over here in buckets, to use in my future cob home (which at that time existed only on graph paper).  After waiting patiently through 2 summers, those buckets of clay, sand, and horse manure were finally re-hydrated, and at last were able to fulfill their destiny as my earthen floor.

We added some more sand to the mix, as well as some freshly chopped and sifted straw, and then Greg got to work with the trowel.

The color of the finish floor is an amazing red!  Beautiful against the yellow clay plaster on the walls…

I did some lime plastering last week as well, giving the interior cob bench one more coat of lime.  And since I was in a plastering mood, I put some lime on the exterior bench, too, and added some more lime around the exterior steps, where there had been some trouble areas that needed a little more rain protection.

Here’s the freshly limed bench, and the new curtains:

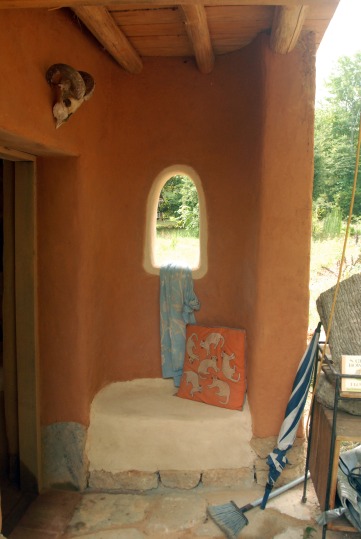
And the bench by the front door.  Perfect for sitting on while removing your shoes, or just for resting a moment on a hot day, letting your back lean against the cool cob wall.

The lime around the stairs:

Once the floor is dry, it’ll be oiled and waxed, and the room will be complete…

except for a ladder…

and a door…

and…

What’s new with the cob house this month?  Lots of things!


As my belly grows larger each week, physical labor becomes more difficult and complicated for me.  I’ve been very lucky lately to have a lot of help from my friends, who’ve done most of the work on the house, in exchange for a meal, and my company….


Greg and Jeremy worked on dry stacking some urbanite steps, so I no longer had to use a five gallon bucket as the first step up to the second floor.  I’ve had some really big pieces of urbanite left in the pile that were way too large to use in the foundation, as well as just much too heavy for me to ever move.  Here’s Greg and Jeremy transforming those chunks of urbanite into my new set of stairs…

Mike and Greg came out on another weekend to help pour the subfloor in the first story.  The mix was 3 buckets of sand, 3 buckets of screenings, and 1/2 bucket of soaked clay.  Its amazing that such a small amount of clay can bind all that aggregate!


The work on the subfloor went pretty fast, so Greg and Mike decided to make an urbanite patio outside the entrance.  Greg started digging while Mike collected rubble for drainage.

Greg found access to my rubble trench, and some perforated drainpipe was laid in the drainage layer of the patio so that it empties directly into the trench.

found the rubble trench!

filling with rubble


and then a layer of screenings...

laying "stones"

the finished patio!


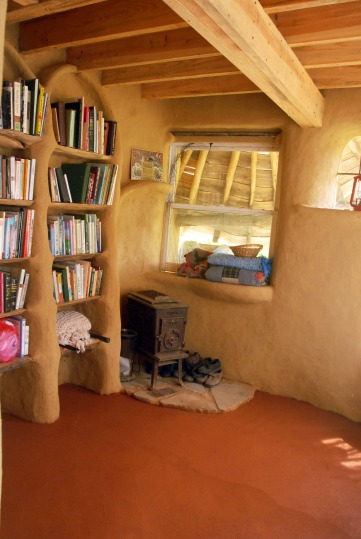
You may have noticed the freshly plastered interior walls in some of the above  pictures.  One weekend we had a work party to plaster the first story interior walls.  Greg and I, as well as our friends Ash, Giovanna, and Kristy, worked together plastering all the oddly shaped surfaces.  Between the bookshelves, niches, window reveals, floor joists, etc, there were a lot of awkward spaces to plaster.  But it was a lot of fun, and so satisfying to see the room transformed by the smooth, smooth plaster.  We used a beautiful yellow-brown clay that we found here on our land, and I really love the color.  I must have been too excited about plastering, because I forgot to take any pictures that day!  But here’s some before pictures:


some niches I carved...

pre-plaster


And the room post-plaster:

Yesterday Greg and Dan came out, and they worked on decking the roof for the outdoor bed.  The poor tulip poplar rafters have been naked and exposed to the elements since last summer.  But not anymore!  Greg and Dan used the rest of the pile of decking I had left over from the main roof, and there ended up being just enough to finish the job.

I’m thinking of trying an experimental “earthen roof”, involving  my pond liner scraps and a final layer of lime and tiles, but I’ll write more about that later.  And, as soon as the subfloor dries, we’ll be pouring the finish floor layer, sealing that with linseed oil and beeswax, and then I’ll finally be able to  inhabit the entire cob house!


moving in!

Now that the second story room is finished, with the plaster complete, shelving built, and a fresh coat of wax on the wood floor, we’ve finally started moving in!  One wheel barrel load at a time, I’ve been transferring clothes, books, blankets, etc down the path to the cob house, up the stairs to the balcony, and through the 2’x3′ door…

Throughout this project, I haven’t wanted to sleep in the house at all.  People always ask me why i haven’t started staying in the house, as its been a functional, dry shelter for a while now.  Maybe I’ve been using the thought of my first night with the house as a way to keep myself motivated to continue building.  Or maybe I’ve only wanted to experience the house fully, in all it’s magical, glorious beauty.  When I went to bed Sunday night, I had the deepest feeling of satisfaction.  Staring up at the roundwood rafters, illuminated by the warm candlelight, a cool breeze coming in through the south window, my cat Bastet snuggled in bed next to me…

All the hard work is totally worth it…

exterior plaster

I’ve been way behind on posting lately!  I’ve been working a lot, gone out of town to visit family, and well… I’m just about 6 months pregnant, so on my days off I’ve been resting a bit more than I would be in my normal, non-pregnant state of being.  So this post is long overdue…

A few weeks ago I had the perfect surprise for my 28th birthday- my good friends Joelle and Alexor came to visit, and help with the cob house.  On their first day here they started off by getting a couple different clays soaking.  One batch is a beautiful deep red clay, which is what we’re using for the exterior plaster, and the other batch is a really nice yellow clay, that we plan on using for plastering the interior of the first floor.  Both clays were dug from our land here, where we’re lucky to have a lot of variation in clay colors.

For my plaster/birthday party, Steve and Greg came out as well, and the five of us had a lot of fun plastering.  Our mix was one bucket of soaked clay to three buckets of sand and 1/4 bucket of chopped straw.  Working with the earthen plaster was a lot nicer than working with the lime plaster.  I enjoyed not having to worry about wearing gloves, or getting lime in my eyes, or having the plaster set up too quickly.  Clay is much more forgiving than lime…

Joelle mixing plaster

steve, greg, & joelle plaster the west wall

joelle buffing the wall with a wet sponge

We got a lot of the west wall plastered, as well as a first coat of plaster over the balecob north wall, and the exposed bale in the east wall.  And since the bales are all covered with plaster, we were able to finally take the tarps off those sections! Yay!  And then, to celebrate a hard day’s work, and my last childless birthday, some more friends came over for some hanging out around the fire, some trampoline jumping, and for sharing all the amazing food Noel made, including his pumpkin black walnut frozen goat yogurt…

Thanks to everyone for all your help!

Over the last couple of weeks I’ve been focusing on making the second story room livable.  After finishing all the cob above the windows and around the rafters, I was really, really excited to get some plaster on the walls.  Watching the cob walls get dressed in a smooth plaster was one of the most satisfying moments of this project for me… to have one room of the house start to feel complete is the realization of a lot of hard work and planing, and it feels great!

Last week we started off by testing our mix on the bench in the first story.  Our mix was one part soaked lime to three parts sand, a little bit of light yellow ocher pigment, and a small amount of alpaca fiber and deer fur.  I’ve been lucky enough to inherit some lime that’s been soaking for five years!   And the alpaca fiber was given to me by a nearby farm, while the deer fur has been laying around from some hide tanning projects.  (The pigment and the sand were purchased).  After plastering the bench, we decided to leave the fiber out of the rest of the mix, as it was clumping up into some hairballs…

Here’s a picture of the plastered bench:

We started plastering the upstairs last week, and got half of it finished the first day, with the rest of the room finished within the week.  In the end it took about three batches of plaster, with each batch being 4 full five gallon buckets of material.

As a side note… always wear gloves when working with lime!  The first day plastering I could only find one of my gloves, and was too eager to plaster to waste any time looking around.  The lime dried out my skin, and ate some holes in my fingertips that were pretty painful.  I’ve been vigilant about wearing gloves during the days since then…

I need to take some better photos soon, but here’s a couple from the first plaster session:

After finishing most of the plaster, I couldn’t wait to remove the tarps from the floor.  Those tarps have been hiding the beautiful wood floor since last summer, and I’ve been eager to get rid of them.  They were actually cobbed into the wall about 1/4 inch, so I had to cut them to remove them.  Once I got the tarps out of there, my friend Steve came over, and spent hours and hours sanding the floor boards.  Now instead of a clay/straw/tarp floor, our floor looks like this:

Greg came out a couple times lately, and in addition to helping me plaster, he worked on building a small door for the second story, completely out of scrap wood.  With a small window at the top and a cat door at the bottom, it’s looking pretty adorable.  This door is 3’3″ tall, and around 23″ wide…

Greg started working on some shelving, too, and once the shelves are done and the floor is finished, that room will be complete!


And because my cats are so cute…

here’s a picture of Bastet sitting in the round window: