Feeds:
Posts
Comments

Archive for the ‘Uncategorized’ Category

Upcoming September Workshop!

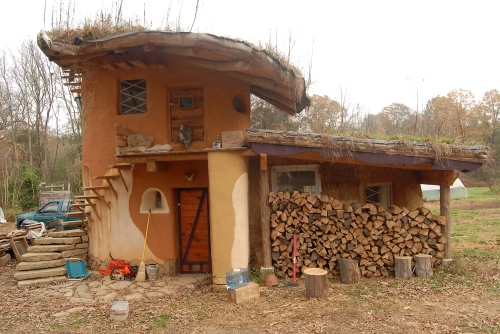
We are excited to be hosting one more natural building workshop this year, September 12th-20th!  During this workshop we will be constructing a one room straw bale and cob addition to our permitted straw bale home.  We have recently completed and moved into our straw bale home, but after deciding to increase our family from 3 to 4 people this winter, we thought one more room would be a nice addition as well!  And there seems to be no better way to do this than to include the loving hands and energy of many people working together.  We are looking forward to make this a fun, group experience, and will be incorporating many different wall systems, so people will get experience with cob, straw bale, bale-cob, wattle and daub, and light straw clay.

For a complete description, check out our school’s website here.

Here are a few pictures of our finally lived-in straw bale home!  We have all been enjoying living here after a long building process.  I hope to take more, nicer photos soon, but for now…

19863365781_32619cd2b4_o 19670005060_a17bdea4d3_o 19850629352_da8114cbdf_o 19670016058_97c5f76ff1_o 19831869586_01404d48fc_o

Read Full Post »

May 2015 workshops coming up!

We just ended a week long cob workshop at the Mud Dauber School, where we are building our straw bale house.  What a lovely group of cobbers!  In seven days eight students plus Greg constructed a tiny cob and straw bale building, from digging the rubble trench on day one:

16821236295_5d0efbc4c3_oto finishing the walls on day seven!:

image11


We are excited to be hosting two more workshops this May, one cob workshop and one straw bale workshop.  You can read about them here: http://muddauberschool.com/workshops/

Sharing healthy and hearty meals while working together is part of the experience during our natural building workshops.  In May we will be working on constructing a cob and straw bale dining area/kitchen!  I am looking forward to the creation of this space, as we build the infrastructure for our school.  And looking forward to many more muddy meals.

Thank you cobbers!

16270125974_4cbb9cb30f_o


Read Full Post »

life in the cob house

We have been living in the cob house for almost two months already!  I don’t quite have the words to describe what it has been like for me to be back in this cozy space, with my family.  I love this house, and all its beauty and gentleness.  Being here brings me so much joy, and a centered feeling that comes partly from reconnecting with a place I poured so much of my energy into, and partly from the qualities of the house.  The curves of the cob walls, the texture of the plaster, the warmth of the wood.  These natural materials are just so comforting!

So far we have been comfortable in this little space.  The wood stove works well and heats up the house, although our winters here are fairly mild.  The earthen floor and cob are a lot of cold, cold thermal mass, though, and if we are gone for a couple of days then the house takes longer to warm up once we get a fire going.  I think the properties of cob are most appreciated here during the intensity of our endless summers, when the temperatures can become quite miserable.  Then the cool floors and walls are refreshing, but for now we wear slippers!

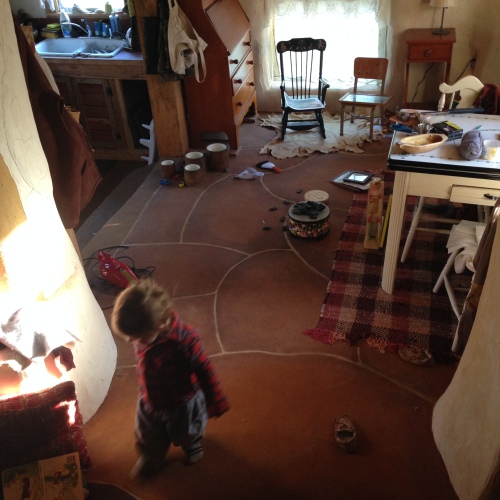
Some pictures of my cozy little hobbit house:

DSC_1003 DSC_1017 DSC_1077 DSC_0915IMG_0298 IMG_0300 IMG_0301 IMG_0444 IMG_0931 IMG_0938 IMG_0953 IMG_0954 IMG_0957


Read Full Post »

connected!

The old south window is gone, as well as the foundation below it and the cob bench as well.  So now the two structures are officially connected!!!  The feeling of the space has now completely changed, with the original room and the addition one large room.  It feels so big and open, and its exciting to be able to now visualize what the completed space will feel like.  I imagine sitting at the (future) table, drinking coffee, the wood stove warming our home and our bodies, Leo running around…

There is still so much more to do, but its looking so nice…

the new south wall


goodbye cob bench!

Here’s a photo of the preparation for the sub floor.  Mike and Greg used chunks of urbanite and old bricks, and then gravel on top of that.  After some tamping the base is ready for the sub floor mix!  The mix they used for the sub floor was 4 parts sand to 1 1/4 parts clay slip, made from the local clay subsoil.

sub floor base

sub floor!:

I brought Leo out again for an afternoon, so he could help out mixing the sub floor.  Thanks for your help Leo!:

Read Full Post »

update on the addition

Wow…once again I am way behind in updating this blog.  I’ve recently realized that one of the biggest changes in my life, now that I’m a mama, is that spending all day each day with Leo causes me to live totally in the present.  I think so much less about the past, and in a strange way less about the future as well.  Although I still make long term plans and spend time figuring out what we’ll be doing next year, and the years after, for the most part when I am with Leo my mind is here only.  When we are playing together, I am allowing myself to be fully present, enjoying our connection together.  This has been a welcome change, but I’ve found that I’ve been pushing other things off to the side these days.  I hardly answer my phone…or respond to emails…or update this blog… Even though the addition is looking totally sweet!!!
I wanted to share some pictures from this summer.  Here are some pictures from July, when Greg and Mike spent a week working together on the addition:

a huge overhang on the east side, for an outdoor cooking space, and a crazy dormer that was our solution for connecting two very different roofs:

Mike decking the dormer:

Light straw clay!:

and here are some pictures from early August, when Greg spent another week working:

windows!:

counters:

Greg finished up the layers of the living roof that week, and even got all the topsoil up there!

EPDM rubber pond liner:

cedar slab wood fascia:

doors:

overhang:

Looking from the east has become my favorite angle from which to gaze at the house.  I am in love with the dormer, with it’s window like a great open eye peering east, and the crazy roof line.  Its the kind of thing you can’t really plan, a harmony between all the different angles, curves, and straight lines that is better than what a more intentional roof line would have been.

So, this week Greg and Mike are able to spend a few days doing some more work on the addition.  Greg went out there yesterday and starting working on the straw bale sections of the walls.  Today I brought Leo out for half the day, and I had the opportunity to do something I never thought I would do – take apart a section of the original foundation!  Greg starting removing some of the cob around the large south double window and some of the foundation below it.  And then I got to spend a while deconstructing the foundation.  What an odd thing it was, to bash the dried, solid cob from some of my first foot mixes for this house.  And to piece by piece remove the chunks of urbanite I had so carefully placed years ago.  Honestly, it was a lot of fun.

Here are some pictures from today:

making custom sized bales:

more bales:

taking apart the foundation:

Bastet observes from the balcony:

my last view before leaving today:

the new living roof has so much life already!:

Also, here’s a video of some of the foundation deconstruction:

Read Full Post »

A few weeks ago Greg, Leo, and I went out to the cob house for a couple days, to rescue parts of the south and east walls from Anthophora abrupta… “miner bees!”  Those sweet mama bees were building little nests in my cob wall – beautiful nests with strange looking earthen tubes extending from the openings.  These bees are a common problem for cob structures in our area; our friends’ cob house nearby had almost turned into a sacrificial bee village until they covered over their earthen plaster with a lime plaster.  Since the lime plaster they haven’t had a single bee drill into the cob!  So while we were at the cob house we plastered over the bee nests with some lime…

lime plaster!

While we were there we also did a little planning… for an addition!  We hadn’t decided yet where we would spend this winter, and after some thought we decided that adding on a small room to the cob house would make it a nice place to spend the winter as a family.  So…

This is a rough sketch of the addition, which will be post and beam framing with some straw bale walls and some slip straw walls.  In the drawing the green is the existing cob house, and the blue is the addition, which will be to the south.  We’ll remove the large south facing double window, as well as the foundation underneath it, and that will be an opening to the addition.  The new room will be an  eating area and small kitchen area (with cooking space outside under a large overhang).  The new space will have a living roof that, at one story tall, will be at about the same height as the existing balcony, allowing the cats (and us humans) to walk right from the balcony onto the green roof.  I’m pretty excited about the design!

Greg had a little bit of time off work, so we were able to get started last Thursday.  Reflective in a way of some of the changes in my life, this project is a bit different from the last.  One of the biggest changes in my life as a mother is time.  I can’t even imagine now what it was like to have free time, time to work on projects!  When I see people working quietly in their gardens, reading a book in the shade, or doing just about anything…alone, I look at them with awe, and wonder when my life might include moments like those again.  For now I am appreciating the joy of my relationship with my amazing, cute and curious Leo.  When he’s older maybe we can even build some things together!  So, the challenge with this project will be time- how quickly can two adults and one nine-month-old create a small naturally built addition, without much money?

On Thursday Greg (who is doing most of the work while I watch Leo) only got in a couple hours of work, which was mainly unloading tools and then staking out the site and starting work on the drainage trench.  By the end of the day on Friday the trench was completely dug, graded, and filled with a couple inches of gravel!  We tied in to my existing rubble trench in a couple different spots, and it was satisfying to have the chance to peer into that trench once again, seeing all the layers just as they were so long ago.

On Saturday the drain pipe was laid, the trench filled with the rest of the gravel and then leveled off, ready for the foundation.

Here’s Greg doing a water test – flooding the trench with water to watch how it flows, making sure the water moves quickly down the slope:

Connecting to the existing drainage trench:

Setting in the drain pipe:

Placing rocks around the drain pipe to make sure it stays put in the center of the trench once more gravel gets dumped on top:

Complete!

Sunday Greg cleared the rest of the topsoil and built some concrete forms for the piers that will support our posts (we’re getting some 8″x8″ posts from the local sawmill).  These concrete piers are one of my compromises for this projects, but they are part of what is allowing this room to be built quickly, with structural integrity.  The rest of the foundation is made of urbanite (reclaimed concrete chunks) and salvaged brick.

Concrete piers:

On Monday I left town for a few hours, and when I got back Greg had almost finished dry stacking the urbanite section of the foundation!  He’s so fast!  The rest of the day we worked on the foundation some more – Greg finished the urbanite and we also spent a lot of time gathering bricks from when the old house on the property was demolished.  We spent a lot of time chiseling away the old mortar…

bricks and chipped mortar rubble…

On Tuesday I got to spend most of the day working!  Greg watched Leo while I worked on the brick section of the foundation.  I had never laid bricks before, and had always wanted to try, so I was looking forward to it.  It was really slow going at first as I got my technique down, but was much faster by the end of the day.  I laid bricks until I ran out of mortar right as the sun was setting.  I like that the foundation will be two different materials, as it designates the two different wall systems and the two different “rooms.”  The straw bale walls will be on the urbanite, and create the eating/living room, and the slip straw (also called light clay straw) walls will be on the brick foundation, creating the kitchen area.

leveling

Throughout all this, Leo has been our big helper:

Today it was raining, and we had some errands to take care of, so we left town for the day, but tomorrow we’ll be back to building!

Read Full Post »

I’ve been meaning to write a new post for a while now, this blog has been so neglected lately.  My days have been full now in a whole new way than before, and I’ve been adjusting to my new life as a mother.  I’m continually surprised by how quickly my days fly by, and by how quickly my son grows and transforms before my eyes!  At first a fresh and tiny human with mostly closed eyes, new to such a bright, dry, sensation filled world.  And now a huge, squirming, laughing, rolling, “talking”, snuggling four month old boy!

My son was born on the last day of August, just before the sunrise.  Born downstairs, right at the foot of the ladder.  And then immediately into my arms for an hour of uninterrupted snuggling and staring into each others’ eyes.  I’ve never worked harder in my life than I did that night!  So many people seem impressed by all the hard work and physical labor that goes into building your own home with natural materials.  But I’m impressed by all these mothers out there!  If you can give birth, and make a new person from your very own body, I’m convinced you can create your own shelter.  We are stronger than we know!

Leo the day he was born!

After the sun came out and in through the southern windows, allowing me to fully see and study every part of my perfect little boy, I also had an appreciation for my environment at that moment.  The first face my son saw was my own, and the first place he knew was the house that I, along with many other people, had sculpted by hand.  When Leo was born he cried, but only for just seconds.  After that he was calm and alert, quietly taking in his new world.  What a special place to be born, in a home whose walls radiate out all the love with which they were built.

Leo and I hardly left the house for a couple magical weeks as we got to know each other more deeply.  Sadly, for the most part we have now been living about an hour away from our sweet cob house, to live where my partner is currently working on a building project.  I miss my house, and look forward to spending more time there some day soon.  And I have plans to finally complete all the unfinished tidbits come spring – finish the exterior plaster, the final layers of roofing for the small eastern roof…install a front door!  I’m definitely craving some creative time spent building, and have even been dreaming lately about some additions to the house.  A bedroom to the east?  Small kitchen to the north?  Oooh, the possibilities are endless.  But right now my time is not!  Soon enough, soon enough…

My son Leopold, born at home August 31st, 8 pounds, 4 ounces and oh so perfect:

4 months old!

Read Full Post »

moving in!

Now that the second story room is finished, with the plaster complete, shelving built, and a fresh coat of wax on the wood floor, we’ve finally started moving in!  One wheel barrel load at a time, I’ve been transferring clothes, books, blankets, etc down the path to the cob house, up the stairs to the balcony, and through the 2’x3′ door…

Throughout this project, I haven’t wanted to sleep in the house at all.  People always ask me why i haven’t started staying in the house, as its been a functional, dry shelter for a while now.  Maybe I’ve been using the thought of my first night with the house as a way to keep myself motivated to continue building.  Or maybe I’ve only wanted to experience the house fully, in all it’s magical, glorious beauty.  When I went to bed Sunday night, I had the deepest feeling of satisfaction.  Staring up at the roundwood rafters, illuminated by the warm candlelight, a cool breeze coming in through the south window, my cat Bastet snuggled in bed next to me…

All the hard work is totally worth it…

Read Full Post »

exterior plaster

I’ve been way behind on posting lately!  I’ve been working a lot, gone out of town to visit family, and well… I’m just about 6 months pregnant, so on my days off I’ve been resting a bit more than I would be in my normal, non-pregnant state of being.  So this post is long overdue…

A few weeks ago I had the perfect surprise for my 28th birthday- my good friends Joelle and Alexor came to visit, and help with the cob house.  On their first day here they started off by getting a couple different clays soaking.  One batch is a beautiful deep red clay, which is what we’re using for the exterior plaster, and the other batch is a really nice yellow clay, that we plan on using for plastering the interior of the first floor.  Both clays were dug from our land here, where we’re lucky to have a lot of variation in clay colors.

For my plaster/birthday party, Steve and Greg came out as well, and the five of us had a lot of fun plastering.  Our mix was one bucket of soaked clay to three buckets of sand and 1/4 bucket of chopped straw.  Working with the earthen plaster was a lot nicer than working with the lime plaster.  I enjoyed not having to worry about wearing gloves, or getting lime in my eyes, or having the plaster set up too quickly.  Clay is much more forgiving than lime…

Joelle mixing plaster

steve, greg, & joelle plaster the west wall

joelle buffing the wall with a wet sponge

We got a lot of the west wall plastered, as well as a first coat of plaster over the balecob north wall, and the exposed bale in the east wall.  And since the bales are all covered with plaster, we were able to finally take the tarps off those sections! Yay!  And then, to celebrate a hard day’s work, and my last childless birthday, some more friends came over for some hanging out around the fire, some trampoline jumping, and for sharing all the amazing food Noel made, including his pumpkin black walnut frozen goat yogurt…

Thanks to everyone for all your help!

Read Full Post »

It’s been a year now since this project began, and it’s fun for me to think about this time last January – digging into frozen ground, with the cob house still just an idea, sketches on graph paper.  My mind switches back and forth, and sometimes I feel like we’ve been working for a lifetime, and on such a small building.  But most of the time I look at the cob house and see this huge earthen structure, looking massive as it rises out of a plot of land that was an empty field just a year ago.  For a building that has the potential to exist for hundreds of years, sometimes it seems to have grown so fast.

I have to admit I haven’t really done any work on the house this month.  The temperatures are freezing, we’ve had lots of snow and ice, and I’ve been a bit under the weather these last few weeks.  But to make myself feel as if I’ve done some work lately, I wanted to post some pictures from the end of December.

Here you can kind of see the layer of carpet underlay we put over the pond liner.  It was all salvaged from a carpet store dumpster, and then meticulously checked over for staples before it ended up on the roof, where it serves as a protective cushioning layer, keeping that pricey pond liner safe.  There is a little bit of soil on the roof right now, mainly around the edges of the underlay, to hold it down.  Working up so high always adds some extra steps, like creating a pulley system to raise rolls of underlay and buckets of soil…

layer of carpet underlay

We finally got the drainage layer ready in anticipation of pouring the earthen floor.  To save money on gravel, we filled the first floor with chunks of urbanite, and then leveled it with purchased gravel.  If we had used only gravel, I can’t imagine how much it would have cost!  Although it looks like I just tossed a bunch of concrete in the house, each piece was placed on the chunks below it so that it didn’t rock, to keep any settling to a minimum.  And once we had raked in all the gravel, there was A LOT of tamping.

tamping

done!

Noel and I also finally installed all the stovepipe, more than eighteen feet of it!  I originally had planned to have the stovepipe go up through the floor and then out the east wall of the second story, where I had thoughtfully left a hole in the wall for the stovepipe.  But, because I ended up with a wood stove where the pipe exits from the rear, I decided it would be a better use of space if I put the stove in a different spot, and had the pipe go straight though the north wall of the first floor.  Which meant we had to make a new hole in the wall.  Greg and I took turns pounding the wall with a heavy steel dig bar until it finally broke through.  Trying to deconstruct cob isn’t easy!  It’s incredible how tough this mix of materials is.

Here’s a picture of the stove pipe exiting through the north wall of the house:

exiting through the north wall

And here’s how it attaches to the roof.  I didn’t want to go through the living roof, so we got one section of insulated pipe and kept it a short distance from the fascia:

As this month comes to a close, I’m getting excited about the days slowly getting longer, the weather slowly getting warmer, my energy returning, and the house getting closer to completion!

Read Full Post »

Older Posts »